Travertine has a way of pulling a room together. The stone’s open pores and soft movement catch light differently throughout the day, so a kitchen floor can look warm at sunrise and crisp at noon. That beauty comes with quirks. Travertine is a calcium carbonate stone, so it reacts to acids, absorbs liquids readily, and wears in high-traffic zones. When a travertine floor starts to look blotchy or pitted, or when a shower wall turns dull and rough, the fix is rarely a single product. It is a process that blends skilled filling, careful honing, and smart sealing. Get those right and travertine holds up in busy homes, restaurants, and lobbies without turning into a maintenance headache.
This guide distills what seasoned pros lean on in the field. Whether you manage a portfolio of properties, run a small stone restoration service, or are a homeowner who wants to understand what you are paying for, the following details will help you separate quick cosmetic touch-ups from durable natural stone restoration.
What travertine is, and why it behaves the way it does
Travertine forms near mineral springs, where dissolved calcium carbonate precipitates and traps gas bubbles. Those voids become the pits and holes you see on tiles and slabs. Some installations leave those holes open for texture, others fill them at the factory for a smoother face. Both versions are correct, but they wear differently.
The matrix is roughly 3 on the Mohs hardness scale, similar to marble and limestone, which explains why it scratches easier than granite. Acids, even mild ones like vinegar, lemon juice, or certain bathroom cleaners, etch the surface by dissolving the top layer. Sealer cannot stop that chemical reaction; only the right finish and care routine can minimize it.
In public spaces, I often see three predictable patterns. First, the path from the front door to the kitchen island shows micro-scratches and flat traffic lanes within 12 to 18 months. Second, the trough where chairs drag at a breakfast nook develops more open pits because filler and soft stone fatigue faster under point loads. Third, showers darken unevenly because of soap film, mineral deposits, and moisture wicking into unsealed edges. Each pattern asks for a slightly different restoration approach.
When filling holes is the right move
Holes in travertine are not just cosmetic. Open voids trap dirt and detergent, which then wick into adjacent stone and create dark halos. On floors, shoe heels and chair legs chip edges around pits, expanding them like potholes. On shower walls, voids can promote mildew spots and make squeegeeing nearly impossible. If holes are multiplying or accumulating grime that no amount of stone cleaning and sealing can remove, filling is overdue.
The decision is not whether to fill, but what to fill with. I see three main categories in professional stone care: cementitious fillers, polyester or epoxy resins, and hybrid polymer fillers designed for natural stone repair. Cement-based filler blends visually with honed finishes and breathes well, but it is comparatively fragile on high-traffic floors. Polyester can be color-matched and polished tight, yet it shrinks a bit and dislikes moisture during cure. Epoxy, especially low-yellowing, knife-grade products, bonds hard and resists impact, but on a soft stone like travertine, an overly hard plug can “picture frame” over time, leaving a micro-lip after honing.
For residential floors that see chair traffic and sandy shoes, I favor high-quality epoxy fillers modified with fine stone dust from the actual floor. That dust helps the color blend and softens the mechanical mismatch between the plug and surrounding stone. In showers or exterior installations where moisture cycles are constant, I want an epoxy with low water absorption and proven UV stability, then I tune the viscosity so it wets the pit walls and keys in fully. For wall features and low-traffic entries, pigmented polyester still has a place because it can be feathered and honed quickly with little mess.
Surface prep that makes or breaks a fill
Filler performance depends more on prep than on the label of the tub. Vacuum the stone thoroughly, scrub with an alkaline stone cleaner to lift oils from the pores, then rinse until rinse water stops sheeting oddly. If you see beading during rinse, a previous topical coating or wax may be present. Strip that before you proceed, otherwise the filler will anchor to the coating, not to the stone.
On greasy kitchen floors, I add a hot water rinse after degreasing to ensure no surfactant residue lingers. Then the stone must dry. Not “feels dry to the touch,” but truly dry. Depending on slab, setting bed, and ambient humidity, that can range from several hours to overnight. Fan movement and a dehumidifier speed it up. If you trap moisture under epoxy, you risk cloudy fringes around the fill.
Edges of the pits should be lightly abraded rather than polished slick. A quick pass with a 120 or 220 grit resin pad opens the pore walls and removes any fractured lips. On older floors, I often find a micro-crust around factory-filled tiles where the original filler has debonded. That crust must go, or your new fill will pop with it.
Mixing, tinting, and placing filler with precision
Color matters more than many assume. Travertine floors vary within a room. One tile can run honey-gold, the next silver-beige with warm veining. I mix small test batches and place a tiny smear on a scrap or inconspicuous corner, cure with heat if allowed, and then compare under the actual room light. Natural daylight at mid-morning shows color differences better than overhead LEDs. If I can see the plug from six feet while standing, it is too contrasty.
Once color is set, I aim for a consistency that wets the surface without slumping out of larger voids. For flooring, I often “butter” the area with a squeegee, pressing filler diagonally across the pits to force material under the lip. Excess is scraped clean to reduce sanding later. For deeper craters, build in two lifts rather than one thick pour; the first lift can be slightly thinner to penetrate, the second slightly thicker to bridge.
On walls, gravity is the enemy. Masking helps, but the real trick is to push filler with a firm plastic blade and use minimal excess. If working over a tub or shower pan, protect the drain with a strainer and tape because cured drips in a trap are miserable to remove.
Cure times vary. Many epoxies are walkable in 2 to 4 hours at 70 to 75 degrees Fahrenheit. Add time if the slab is cooler. A gentle pass with a heat gun can accelerate cure, but keep it moving and avoid localized overheating that can amber a pigment.
Honing: where the floor regains its evenness
Honing levels the fills flush and removes etches, scratches, and embedded soil in the top fraction of a millimeter. It sets the reflectivity you will live with. Gloss hides nothing on travertine; every patch and cross-seam shows under high reflection. A low to mid-hone, typically between 220 and 800 grit depending on the look you want, is easier to maintain and better at masking minor color drift in filler.
Two common mistakes appear in field work. One is starting too coarse across the board. If the floor only needs to flatten fills and remove light etches, a 220 grit metal-bond pad is overkill and can open the pores too aggressively, leading to a thirsty floor that darkens randomly when sealed. The other is skipping grits. Travertine telegraphs swirl marks, especially under angled sunlight. Each grit should remove the previous pattern fully, then move on.
I map the room by lighting conditions. Near a bank of windows where raking light reveals everything, I widen my overlaps and slow the machine. In hallways, I hone along and across the path to avoid directional sheen. Weight and slurry management matter too. Excessive downward pressure can create low spots at the edge of a planetary machine. Keep the slurry wet enough to float cuttings and vacuum between grits to keep abrasive from contaminating the next step.
Edges rarely match the field unless you plan for them. I keep dedicated hand pads for toe-kicks, door thresholds, and stair noses, aligned with the same grit progression. If you leave edges shinier or duller, your eye will pick up the mismatch as a dirty band.
Polishing is optional, and often a bad idea
Travertine takes a soft polish, but a high-gloss finish shows every etch the first time a lemon wedge hits the floor. Many homeowners request a satin or velvet sheen, something that reflects light without acting like a mirror. If the stone is tight enough after honing to 400 or 800 grit, you can stop there and seal. Polishing powders built for marble also work on travertine, yet they increase the chemical reactivity, and maintenance costs go up. For busy kitchens and bathrooms, a refined hone paired with an appropriate sealer is the workhorse option for stone surface rejuvenation.
If a client insists on more sheen, I use light polishing with a dedicated travertine compound and keep it to a range that still reads as matte from a few steps away. That way, etches and micro-abrasion blend better between maintenance visits.
Sealing: the last coat is not a cure-all
Seal the stone after honing and thorough rinse. The goal is to slow absorption of oils and dyes and make daily cleaning easier. There are two categories worth considering: penetrating impregnating sealers and topical coatings. For travertine floors and showers, I avoid topical coatings unless a specific commercial need exists, such as non-slip film in a restaurant entry. Coatings scratch, turn cloudy under shower steam, and require stripping. Impregnating sealers penetrate, leave the surface feeling like stone, and keep vapor transmission intact.
Within impregnators, you will find water-based and solvent-based options, both excellent when formulated well. Solvent-based products tend to drive deeper into dense sections and flash off quickly, which can be helpful on mixed-density travertine. Water-based products have low odor and easier cleanup. Both are suitable for stone polishing and sealing when cure time is respected.
An enhancer can transform lifeless beige into rich tan with depth, but it will also darken the filler. I test enhancer in a small area that includes several repairs, not just raw stone, so the client can see the final picture. Once you enhance, you do not go back without a full resurfacing. For most kitchens and larger continuous spaces, I prefer a natural-look impregnator to keep color even and avoid highlighting patches.
Application technique separates neat, even protection from streaky mess. I flood-coat only on tight, dense stone. On open travertine, I apply with a microfiber towel or lambswool applicator in thin, even passes, working small areas and keeping a wet edge. After dwell time, any excess must be buffed off dry. Residue left on the surface cures to a haze that ruins the finish and can attract soil. Two coats, applied per manufacturer’s dwell and wipe instructions, are common on honed travertine. Very porous stone may take a third.
What etch removal really involves
Etching is not a stain. It is a micro-dissolution of the surface that changes texture and reflectivity. If you can feel a rough spot or see a light splash mark under low-angle light, you are looking at an etch. Poultices do not fix it. The solution is mechanical: a localized hone that feathers out the damaged patch until it matches surrounding sheen, followed by resealing.
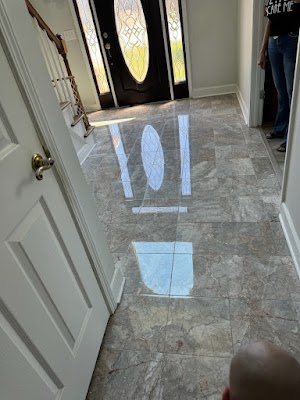
On counters, especially around sinks and coffee stations, I keep the repair tight so the area does not become a visible “improvement ring.” For commercial bars, I recommend sacrificial serving boards and a clear service protocol because repeated etching will outpace any stone maintenance tips you can provide. For homes that see frequent citrus and wine, consider a more forgiving finish or a different stone for the countertop. Granite restoration or engineered surfaces might make better sense in those specific zones.
Integrating scratch repair and lippage control
Scratches on travertine range from hairlines to deep scores. Hairlines from grit under a chair glide can blend at 400 to 800 grit, while deeper gouges require spot grinding. If you try to skip directly to a high grit because the scratch seems minor, you risk polishing the edges of the scratch and leaving it visible as a bright line.
Lippage, or the height difference between adjacent tiles, complicates honing. If lips are under about 0.5 millimeters, a careful hone can ease transitions without a full flatten. When lips exceed that, you are in stone floor restoration territory and should consider a true flattening with metal-bond diamonds, then a full resin progression. Customers often ask if you can fix isolated lips without doing the whole floor. Technically yes, but the risk is creating flat “pads” that read differently under light. I reserve isolated lippage correction for corners and small rooms.
What maintenance looks like after professional stone care
Proper maintenance protects your investment. The cleaning routine is simple but specific, and it matters more than any single restoration step.
- Use a pH-neutral stone cleaner, diluted per label, and a microfiber mop on floors. Change solution frequently to avoid re-depositing soil. For counters, spray and wipe, then buff dry to avoid streaks. Fit chairs and stools with high-quality felt or polymer glides, check quarterly, and vacuum grit before mopping. Grit acts like sandpaper and defeats the purpose of honing.
Treat showers differently. Squeegee glass and stone after use, then towel-dry the stone once daily if possible. A weekly wash with a neutral cleaner prevents soap scum and mineral buildup that can mask a good seal. If your water is hard, consider a softener or a rinse additive to reduce spotting.
Expect to re-seal high-traffic floors every 1 to 3 years, depending on use and product. Counters kitchen countertop repair services can stretch longer if spills are wiped promptly. Showers vary widely; ventilation and routine drying can double the interval. The simplest field test is a water-drop test in several spots. If water darkens immediately, the sealer is tired. If it beads briefly then wets out, you have partial protection and should schedule a maintenance coat after a deep clean.
When to call specialists, and what to ask
There are times when a DIY approach works, like filling a couple of pits on a backsplash or touching up a minor etch near a window. But for full rooms, lippage issues, heavy etching, or mixed materials in one plane, professional stone care pays for itself in fewer passes and a better long-term outcome.
When you hire stone restoration services, ask about their planned grit sequence for honing and how they handle edges and thresholds. Request a fill sample on your stone with the lights you actually use. Clarify the sealer type and whether the quote includes a post-cure burnish or second coat. Good contractors do not hide behind jargon. They will describe stone surface restoration in practical terms and set expectations around smell, cure time, and room downtime.
If your project includes more than travertine, such as a marble vanity or a granite island, verify that the team understands each surface’s chemistry. Marble restoration focuses more on etch blending and polishing powders, while granite restoration leans on harder abrasives and, sometimes, a different category of sealer. Combining scopes smartly can save a visit later.
Lessons from the field: a few concrete examples
A restaurant foyer I service has crema travertine set in a 3-foot border that sees thousands of steps a week. The original fill popped within a year. We switched to an epoxy filler dusted with the stone’s own slurry and widened our honing footprint at the entry by two tiles. Sheen was set to a 400 grit honed look. Now, fills last 18 to 24 months, and we refresh them in one overnight shift. The cost curve flattened because we stopped chasing isolated pits.
In a suburban master shower, the homeowner complained of dark dots returning days after cleaning. Moisture readings were high at a niche. We removed failed grout at the niche base, re-waterproofed, and re-filled pits with a low-absorption epoxy before honing and sealing with a breathable impregnator. The dots disappeared because water stopped migrating into the stone behind the face, not because the sealer was magical.
On a kitchen counter with frequent citrus use, the client wanted a satin glow without constant etch marks. We honed to 800 grit, skipped high polishing, and used an enhancer-sealer tested on repaired spots. We also added a simple prep station mat near the sink and supplied a pH-neutral cleaner. Six months later, the surface still looked uniform, with only a couple of blended micro-etches around the juicer.
Common pitfalls and how to avoid them
Filling without cleaning soils locks dirt under translucent resin, resulting in shadowy plugs that read like stains. Be ruthless about degreasing first. Rushing dry time is another. If you fill on a damp slab, you will see detachments or cloudy perimeters around patches within weeks.
Over-honing is a quiet failure. Open pores drink sealer unevenly, giving the floor a leopard print under certain light. If you see dramatic darkening in random patches during seal application, the surface may have been cut too aggressively, or the stone is naturally variable. A second thin coat often evens it, but the better answer is a controlled cut next time.
Relying on acidic cleaners to remove mineral deposits is a short road to an etched floor. Use pH-neutral cleaners daily and dedicated, stone-safe descalers sparingly, followed by immediate rinse and neutralization. For stubborn scale in showers, a plastic scraper and patience do less harm than an acid bath.
The long view: extending life between restorations
Travertine holds up beautifully when restoration and maintenance align. A realistic program for stone floor restoration in a busy home might include a full hone and seal every 3 to 5 years, with an annual deep clean and top-up seal in traffic lanes. In commercial spaces, plan on quarterly inspections and touch-ups of high-wear edges and a more frequent deep-clean cycle. For stone countertop restoration, periodic etch blending and a re-seal every couple of years typically suffice.
Blend the craft with the context. An open-plan kitchen with dogs, kids, and a patio door needs a different sheen and sealer than a formal dining room used twice a month. Bathrooms with poor ventilation demand breathable products and diligent drying. If your property mixes materials, keep a short log of what lives where: travertine in the foyer, marble in the powder room, granite on the island. That record simplifies future service calls and helps stone sealing specialists bring the right tools and chemicals.
Where travertine fits among its cousins
Travertine sits in the same calcium family as limestone and marble, and the restoration logic overlaps. Limestone restoration typically involves more flattening because large-format tiles highlight lippage. Marble polishing services push a higher gloss more often, which raises the stakes for etch control and scratch removal. Granite, with its tougher silicate structure, tolerates higher-speed polish and different abrasives, and etches less under household acids, though not immune to alkali-based damage or hard water film.
Knowing those differences prevents cross-contamination of techniques. A powder that sings on a marble vanity can burn or orange-peel a honed travertine floor. A granite sealer with strong solvents might flash too fast on porous travertine and leave residues. Professional stone care means matching product to mineral, not just surface appearance.
Final checks and a practical plan
Before signing off on a restoration, do a walkaround in multiple lighting conditions. Look at the floor from kneeling height to spot swirl patterns that vanish at standing height. Wet a fingertip and touch-test a few sealed areas to gauge absorption. Run a bare hand across repaired zones; you should not feel a ridge. If the space is large, choose one reference tile and photograph it with a consistent angle and light. That gives you a baseline when you check in months later.
If you are scheduling work, align it with living patterns. Counters can be turned in a day, floors in main corridors need two to three days when you include cure time. Plan alternative paths and temporary granite countertop polishing kitchen setups. That planning, plus crystal-clear expectations on sheen and sealer type, avoids the last-minute compromises that lead to premature rework.
Travertine rewards that level of attention. Done right, filling returns a clean, continuous surface, honing sets a durable, easy-to-live-with finish, and sealing equips the stone for everyday life. You do not have to baby it, just respect its chemistry and structure. The result is a floor or countertop that ages gracefully, looks better under real light than in photos, and stands as proof that stone surface restoration is a craft, not a catalogue of products.